Wednesday 28 January 2015

28 days of Blocks

Block 25 - English Rose (Patchsmith applique design)
I have been having fun with my Block-a-Day and I've introduced the first applique block into the collection - shown above. 
Block 23 - Basket 1 (Carol Doak)
Block 24 - Night and Day Log Cabin (Patchsmith)
Block 26 - Framed Tree (Carol Doak)
Block 28 - Pencils (although Carol Doak calls them 'crayons')
And I have created my first mistake block as I miscalculated the reduction of a Tumbling Blocks square.  I'm sure there will be more mistakes throughout the year and who knows, I may even invent a new block by accident!
Block 27 - Oh No! (this mistake design is all mine)
My organised mind is thinking of ways to bring some sort of order to this year-long project so all blocks for the month of February with be based around the theme of LOVE.  Expect lots of lovely hearts.

Be sure to check back next month as I hope to include a tutorial on making a scrappy patchwork block ..... or two!  In the meantime you can find all the blocks made on my Block-a-Day Pinterest board or over at the Flickr group.

Friday 23 January 2015

Scrappy 2015 – time to destash those scraps

2015 is the year of the fabric scrap and I am on the lookout for anything that helps me destash my scraps.  So I didn’t think twice when accepting the Sew-My-Stash first challenge of the year – a Valentine project using nothing but little more than scraps.
Country Love Hearts Mug Rug
Obviously it had to be a mug rug – I am the Patchsmith after all!  What better way than to update my Love Hearts Mug Rug pattern using nothing but pink, turquoise and red scraps.  The background for the hearts is a rogue charm square that was languishing in the bottom of my scrap box - even the binding is from off-cuts.
I'm get the feeling that Scrappy 2015 is going to be a year full of fabric, fun and friends. We are only three weeks into the year and I've had so much fun already.

If you want to join in this Sew My Stash challenge you better get your skates on - all projects should be finished by the end of Sunday 25th January.  But don't worry - you can always join in the next one.

Thursday 22 January 2015

Block-a-Day is up-to-date

Block 22 - Schoolhouse
I caught up – Block 22 Schoolhouse completed today.  From hereon in it is just one block a day for the next 343 days – easy-peasy!  Have to say I am loving it.  It is scrap-organising extraordinaire!  Fancy a gander ("gander" = slang for look)?
Block 15 - Boxed-in
I just had to slip in a little patchwork.  I think this block is my favourite so far.
Block 16 - Apple (Carol Doak)
Block 17 - Nine-Patch.  A little more patchwork from me.
Block 18 - Shamrock - another Carol Doak 3" block.
Block 19 - Birdhouse (Carol Doak)
Block 20 - Big Mug
Original 6" pattern from Block Central reduced by half!
Block 21 - Crocus (Carol Doak)
What a great way to see how fabrics look together.  These are my Patchique fabrics.
So there you have it.  22 blocks - one for each day of the year so far.  If you fancy joining in - with a block-a-day, block-a-week or even a block-a-month then be sure to pop over to the Flickr group and say "hello".  

Until next time ......

Sunday 18 January 2015

Paper-piece and patchwork fun

I was four blocks into my 2015 BAD (Block-a-Day) project last time we chatted.  Well I have been playing with my fabric scraps and now, five days later, I am fourteen blocks in.  Fancy a butchers hook (cockney rhyming slang for ‘look’)?  
(All blocks are 4½” including borders unless stated otherwise.)
Block 6 - House (Carol Doak design)
Block 7 - Birthday Cake (patchwork 6" x 7")
This block was minimized from the FQ Shop's charity Snapshots QAL
Block 8 - Sewing Machine (paper pieced 6" x 5")
This block was minimized from a Regina Grewe design
Block 9 - Quarter Square Triangles from
two orphaned HST blocks left-over from the Wishes QAL.
Block 10 - Tree (Carol Doak design)
Block 11 - Cup-and-Saucer  (minimized from a Piece-by-Number Design)
Block 12 - Squares-within-a-Square
Block 13 - Feature Square (Carol Doak design)
I added some very simple stitching to this one.
Block 14 - Log Cabin Tree (minimized from a Linda Causee design)
You can see all blocks made to date over on Flickr, Pinterest or Instagram (#patchsmithbad2015).

This is so much fun but it hasn't made a dent to my fabric scraps yet!

Thursday 15 January 2015

How to Enlarge a PDF Mug Rug Pattern


Whilst a small mug rug is a beautiful thing, sometimes a little bigger is just what is needed. With that in mind, I would like to share with you how I enlarged my mug rug pattern using a home printer and Adobe Reader (if you don’t have Adobe Reader you can download it for free from Adobe).   Note:  These instructions will not work for tablets, phones, handhelds or touch devices due to the limitations of the Adobe Reader application.   
Valentine Hearts Mug Rug Pattern

Firstly choose your mug rug pattern - you will find a large selection in my Etsy Store.  For this project I chose to enlarge my Valentine Hearts mug rug pattern in order to create a Valentine Hearts table runner.
Valentine Hearts - large and small
Before we start you will need to open the pattern you wish to enlarge in Adobe Reader.  Make a note of the page number of the appliqué sheet (all Patchsmith patterns have page numbers at the bottom). Once the pattern is open, proceed to the print screen as you normally would (i.e. from the ‘file’ menu or using the print icon or by pressing CTRL + P keys).  This will open the print dialogue box as shown:
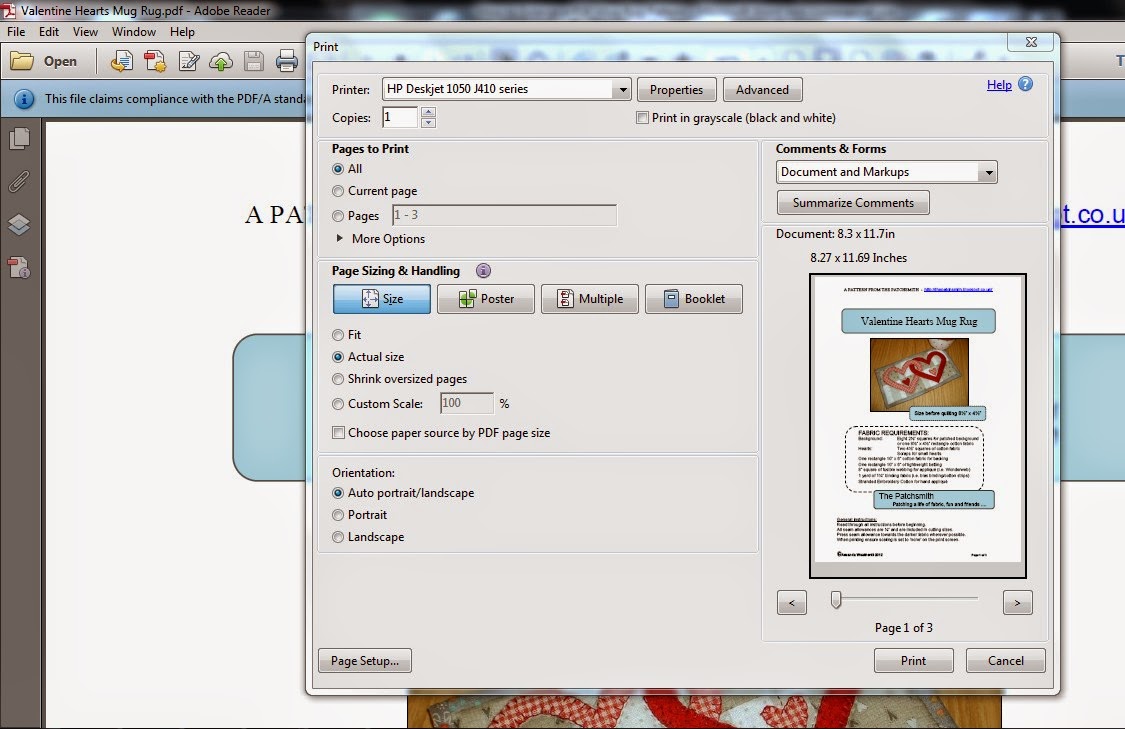
Adobe Reader Print Box
 (if you don't see this screen then you should make sure you are using Adobe Reader - it will say 'Adobe Reader' at the top of your screen, next to the file name)
Now you are ready to make the following changes to the print dialogue box to enlarge your chosen pattern sheet (descriptions for each step are provided below the screen shot):
You can print out these instructions for a larger view of this screen shot.
1.         Firstly, you only want to enlarge the appliqué sheet and not the complete pattern so enter the page number of the appliqué sheet into the ‘pages’ box of the ‘Pages to Print’ section.  In the case of the Valentine Hearts pattern this is page 3.

2.         Select ‘poster’ in the ‘Page Sizing and Handling’ section. This will change the preview picture on the right hand side. The ‘poster’ option does not enlarge the print but positions it over multiple print pages. 

3.         Now comes the fun bit – ENLARGING.  Enter a figure larger than 100% into the ‘Tile Scale’ box.  100% is the normal size so if you wanted it twice as big you would enter 200 into the ‘Tile Scale’ box.  (Do this and then click on the ‘poster’ button again to see the preview picture change.  It is now showing eight pages and the mug rug is twice as big.  Change the 200% to 150% and click on the ‘poster button’ - the number of sheets in the preview picture has now changed to six - the mug rug is 50% bigger than the original.)  You need to decide how big you want your pattern to be and this can require a bit of trial and error if you are not very good at math.  In the case of the Valentine Hearts runner I enlarged to 175% which made each heart measure approximately 7½” wide by 6¼” high. 
Tip:  Whenever you enter a figure in the ‘Tile Scale’ box click on the ‘poster’ button to change the print preview so you can see how many sheets of paper you need.

4.         Make sure the ‘Cut Marks’ box is checked as this will help when you come to stick the pages together.

5.         Then press ‘Print’ – making sure you have enough paper in your printer.  You may find some pages are blank due to size you’ve chosen and the way the appliqué page is centred on the page – just reuse any blank sheets. 
Tip:  Any print-check guide will no longer be correct as it would also have been enlarged i.e. 150% enlargement will make 1” measure 1½”, 175% will make 1” measure 1¾”, 200% enlargement will make 1” measure 2”, etc.

6.         Stick the pages together to create an enlarged pattern sheet.   

7.         A VERY IMPORTANT STEP.  When you go to print another pattern your computer may remember the last print settings used so you will need to reset your print screen so that the pattern prints to the ‘actual size’.  Make sure the following are selected when printing patterns to the correct size (i.e. not enlarged):
And if you prefer to read these instructions as you work through the steps you can download a PRINTABLE COPY just for you:  

Until next time .................. 

Wednesday 14 January 2015

Block-a-Day with the Patchsmith

Block 1 - Heart 1
I have seven boxes full of fabric scraps, two boxes full of binding off-cuts and over a hundred odd charm squares left over from various projects.  I don’t like to throw things away so I have come up with an ambitious, plan – a Block-a-Day (BAD) project.
Block 2 - Candle
That’s 365 blocks over the course of 2015.  I am starting with Carol Doak’s 50 Little Paper-Pieced Blocks.  These blocks measure just 3” square but I am adding a little border to each so that they finish at 4½” square. This first book should take me through to the middle of February.
Block 3 - Heart 2
But there is a slight hic-cup already.  I am 10 blocks behind as I didn’t come up with this plan until this week and I’ve only completed four blocks to date!  Never mind – I have created another plan - the catch-something-BAD plan.  I shall catch up on my Block-a-Day (BAD) project over the next ten days by making two blocks a day.
Block 4 - Six-Pointed Star
Hopefully by the end of January I would’ve ‘caught-something-BAD’ and be all set for the rest of the year!

Which just leaves me to ask - anybody fancy catching-something-BAD with me?  

You can follow along over on Instagram (#patchsmithbad2015 or #thepatchsmith).  Or check out the blocks over at the Patchsmith's Block-a-Day Flickr group or on the Patchsmith's BAD Pinterest Board.  

Until next time ........

Wednesday 7 January 2015

Across the Pond - Sewing Machine Cover

The Patchsmith's Sewing Machine Cover
My sewing machine cover is complete and, as promised, here is how I did it (grab a cuppa - this is a long post).

To begin with I measured my machine and listed the measurements on a sheet of paper.  Add 1" to the width, depth and height to allow for seam allowances.   (Note: I have a little Husqvarna Viking H100Q measuring 15” wide x 11-12” high x 8” deep). 
Patchwork Cover from Sew Delicious
I used Sew Delicious’s cover as inspiration and patched twenty eight 4½” (cut) squares to create a panel measuring 28½” x 16½”.  This doesn’t seem big enough given the machine’s dimensions but when I laid it over my machine it draped down the front and back onto the work desk so I knew it would fit just fine even after quilting.
Next I wanted to create a gap for my machine’s handle – essential as I take my machine out-and-about with me. 
Portable Sewing Machine and Cover
I added ½” to the length of the sewing machine handle (for me this was 6½” + ½” = 7”) and did the same for the thickness of the handle (½” + ½” = 1”).   Using these measurements I marked a piece of interfacing with a rectangle measuring 7” x 1” - this would be my stitching line.  In the middle of this rectangle I marked the actual length of the handle (6½”) and drew lines up to the corners as shown.  These would be my cutting lines.
Solid line is stitching line - dashed lines are cutting lines
I placed the lining fabric RIGHT SIDE FACING UP on top of a rectangle of batting (both the lining and batting were 5” larger than my patched rectangle).  I then positioned the patched rectangle on top of the lining, RIGHT SIDE FACING DOWN (thus lining and patchwork are right sides together).  Finally I pinned the marked interfacing rectangle to all layers, in the approximate position of the handle (slightly to the right of centre). 
Using a small machine stitch, I stitched along the solid rectangle marked on the interfacing.  Once this was done I cut along the central line and out to each of the corners as indicated by the dashed line.  NOTE:  Do not cut right into the corners as you may cut through the stitching – cut as close as you dare.  My finished corners are always a little rumpled when using this method as I am cautious of cutting into the stitching.  However, if you do cut through to the stitching you can always re-stitch around the solid line again.
The lining is showing through.  If you gently pull the lining away
from the gap as you press, the lining will disappear from the front of your cover.
Once done, turn right-side out by pushing the patched rectangle through the stitched gap (the lining and batting should now be lying behind the patched rectangle).   Press.
Once pressed the lining is no longer visible.
You can leave the gap as it is and get on with quilting your cover ....
.....or you can do as I have done and top-stitch around the gap before quilting the rest of the cover.    

Next I made the pocketed sides using another blogger's tutorial which is, unfortunately, no longer available.  So here is how I created the pockets ...... For each pocket I cut one pocket lining, one pocket outer - both approximately 8½” (wide) x 8” (tall).  I placed them wrong sides together and bound the top edge using 2" strips of fabric and the single-binding method.  Next I cut the a side panel to measure 10" x 14" (the dark pink fabric in the photo below). I placed a piece of batting behind the side panel and quilted it (simple cross-hatch).   I repeated this for the second end panel/pocket.     
I quilted the side panels before adding the pockets.
Once the side panels were quilted I trimmed them both to measure 8½” wide by 12” high and I rounded off the top corners using my Frixion pen (it disappears once ironed - very clever).   I lay the two pockets on top of the quilted side panels and pinned them in place. 
I drunk the tea before using the mug as a template.
I didn't want splashes on my new sewing machine cover - well not on the first day of use anyway!
Then it was just a case of pinning and stitching it all together which was made easier by those rounded corners.  Finally I bound the bottom using 1¼” scrappy binding.

I can fit cables into one pocket  .....
.... and my 12” x 6” cutting ruler, Dresden template and other notions in the other pocket. 
   
If you want to add a handle gap to a sewing machine cover you have already made then take a look at Quilty Creations’s version.  
Quilt Creations Sewing Machine Cover
Karen uses a small piece of fabric to create the handle lining  and I think this could be incorporated into an already made sewing machine cover (she also details how to make her own cover complete with side pockets).

Don't forget to share a photo of your cover - old or new - over at the Across the Pond Flickr group.

Until next time .......