Monday 24 June 2013

Zakka 2.0 - Where's the point?

Week 4 on the Zakka 2.0 trail is the Polka-Dot-Cafe Apron - a project that is rated as a two star difficulty – a rating which in my humble opinion, has to be taken with a large pinch-of-salt.  The rating may apply to the actual apron construction (not very difficult) but the patchwork is a different matter.  I love patchwork but I needed to use my seam ripper and I lost the corners of my little squares when sewing the pocket to the backing.  But I am not a perfectionist so I won’t spend another afternoon remaking the pocket – I won’t I tell you!  
The term “Zakka” is a Japanese word that represents a collection of items.  This sew-along, together with the first Zakka sew-along, both have a certain style – Japanese, linen, simple lines, fussy-cut images – you know what I’m talking about.  However, I am more modern country, gingham and cotton prints.  So I have constructed my pocket in the typical style of this Patchsmith – complete with signature bee!

I will stitch in the ditch rather than overstitch
I tried overstitching and unpicked it as I didn't like the look. 
Patchwork is an art and it takes practice.  It is an activity that I enjoy.  I am in the process of finishing off a table runner which has a traditional block pattern which looks quite difficult but isn’t – here is a quick glimpse.
The apron pocket patchwork in the Polka-Dot-Cafe apron looks tricky and it is. You may end up with three blocks that look perfect.  However, when you have finished and you come to join the three blocks together you will need a lot of patience especially if you want to get all seams to match and not to lose any points.  You may create three perfect blocks stitched together, as I thought I had, only to find you lose some points when you stitch it to the background.    The points are there – you just can’t see them.  

But never fear - here are some Patchsmith points to replace those you've lost:

1.         If you don’t have a ¼” foot then you can draw a ¼” seam allowance on the WRONG side of your fabrics - or add a piece of tape to the needleplate of your machine to help you keep on the straight and narrow.
2.         When matching points just stitch where the points meet initially and not the whole seam.  Once you are happy that you still have your points (if not your sanity) then go ahead and stitch the rest of the seam.

3.         Patch the four large triangles once all other pieces have been stitched together.  Centre the point of the triangle with the centre of the large square to make sure it is in the right place.  Regard the diagram on page 53 of the book as three diagonal units that you stitch together before adding the large triangle corner points.
4.         Do not worry if your finished block is not 6½” – you can adjust the pocket lining measurements to suit.  Just make sure you trim all blocks to the same size.

5.         If you are new to patchwork (or you wish to remain sane) don’t go for fussy cut motifs for the little squares but pick a multi-directional pattern.

6.         Check out Sewzalot’s version – she has added a strip between the blocks – cutting the need to match the points block-to-block.  I wish I’d thought of this!!!
And the point of this whole project - indeed the point of this sew-along? The point is to enjoy the process and ditch the perfectionism.  Smile and congratulate yourself, enjoy your efforts and give yourself an “A star” for completing this functional project.  But whatever you do – don’t rate your efforts in relation to the two star difficulty rating as you may be left missing the point!
p.s.  I shall be buying some twill in the week and will finish my apron ready to post to the Flickr group at the end of the week but in the meantime pop over to Cut-to-Pieces, the blog host for this week and take a peek at her beautiful, all-points-present apron.

Sew until later .................

Friday 14 June 2013

Birthday Tea

I know breakfast is widely regarded as the most important meal of the day but I disagree.  I also know that lunch is the perfect time for a break in the day but I know a better time.  And dinner has universal appeal.  But there is one meal that knocks all these into touch – it is a meal I am particularly fond of, a meal that has universal appeal to young and old alike and it is a meal that transforms an ordinary day into a blissful day.  Yep, it is time for tea ......
..........and cake .....
 
It's TEA TIME!!
The Zakka 2.0 project for this week is applique based – right up my street.  So much so that I combined Ayumi’s letters with my mug pattern from my One Block pattern book.
This week's project specified linen as the fabric of choice.  But, if I learned nothing else from Zakka 1.0 I did learn that linen is awful to launder.  It creases as soon as you hold it and it soaks up water like a sponge.    I didn’t want my handiwork spending more time in the washing machine than on display so I chose to work with 100% cotton instead. Having said that there are some linen tea-towels in the Flickr group that look awesome so I have to stress – this is just my opinion.

Also, as Amy points out on Amy Made That (and she made a gorgeous retro tea-towel) – linen is expensive whilst cotton is not.  What is more, cotton tea-towels are easy to come by.  I purchased a set of three from Marks and Spencers and they even came with a little hanging loop on one corner just like Ayumi's.
(I am wondering if the M&S designers have read Ayumi's book - same hanging loop!)
Once I got down to the applique this project went together quickly and easily but ..... and it is a huge BUT ..... why, oh why do the publishers not provide us with full-size pattern sheets.  I know the argument about saving space in a book but in this day-and-age they could provide on-line access to the full-size sheets or even on-line access to the print outs so that we could enlarge them quickly and easily.  I believe the book is available in an on-line version anyway so it wouldn’t even be that much work for the publishers.  I wasted over an hour trying to get the letters to the correct size. 
My copier/printer would only enlarge to certain sizes – 167% was not one of them!!  In the end I scanned the page and saved it as a PDF.  Enlarging a PDF at print time is easy – it is on the print screen.  But I have yet to figure how to print an enlarged pattern over several pages.  This is, and always will be, a bug bear of mine.  It needs shouting from the roof tops – FULL SIZE APPLIQUE SHEETS PLEASE!!! 

Onto other matters ..... you must’ve heard about THE BIRTHDAY.  It is the talk of the world.  I do not mean Queen Elizabeth’s birthday although I did celebrate this with a cuppa and a cookie.
 I don’t even mean Prince Phillip’s birthday though this too was marked with another cup-of-tea and a cookie.
No I mean THE birthday – the Patchsmith’s birthday.  Surely you didn’t think all the flags and bunting were for Lizzie and Phil?   This coming week is a royal week here at Patchsmith Palace as my birthday marks the start of another year of fun, fabric and friends. 
As a special treat I would like to mark the day with a little competition ...... ‘guess the Patchsmith’s age’.  Now it has to be said that I am like the Queen in that I have two ages – one official (birth certificate in evidence unfortunately) and another that is my preferred age.
I will be giving away three mug rug patterns:
 
Spring Chicken ......
Is the Patchsmith a Spring Chicken or an old bird?
Flower Patch .......

and Coffee and Cake........
These three patterns will go to the first person to guess my preferred age.  Just leave a comment with your guess (only one entry per person) and I will check in regularly to see who guesses first (you should also make sure I can contact you via email somehow!)

***** UPDATE - Competition is closed *****
Linda guessed my preferred age as 38 y.o.
Thank you everybody for taking part in this little bit of fun.

Sew until next time ........ 

Wednesday 12 June 2013

Making Waves with The Patchsmith

Whales Mini Quilt – 9½” square
Ellison Lane have a Mini Quilt Challenge going on and I thought I would join in.  I have not entered an item in a competition before so when this little quiltie challenge turned up, urging me to try something new, it seemed appropriate.
The ‘new’ could be a pattern, a technique, a fabric, thread or colour.  I thought I would try a new pattern – my Whales Mug Rug pattern. 
But it didn’t seem enough of a ‘new’ as I am often making new patterns (over 50 of them in the last nine months!)  so I decided to incorporate a new technique. 
The new technique I decided to try was the 3D Flying Geese block. 
I love the flying geese block and I usually make them by sewing corner triangles onto a rectangle. However, the 3D flying geese block requires only one seam and because of this, it is really easy to match up the geese without sewing off the point.  There is a very good You Tube tutorial  showing how to make them but here is a basic run-through of the process for those who prefer a paper copy (click on the title for a PDF print out): 

(makes one goose measuring 2½” x 1½” raw/2” x 1” sewn in)

Cut one goose rectangle measuring 2½” x 1½”.
Cut two background squares measuring 1½”. 
 
Fold the goose rectangle in half with wrong sides together.  Finger press (do not press with an iron). 


You will now layer the goose between the two background squares as follows:

Lay one background square right side facing up.  Lay the folded goose rectangle on top with the raw edges lined up with the top of the background square as shown. 


Note the folded goose block is slightly shorter than the background square so you should have ¼” excess background square showing at the bottom. 


Next place the other background square on top of the goose, right side facing down so that it overlaps the bottom background square completely. 
In effect, you have a goose sandwich!

You stitch the unit together down one side of the sandwich as shown. 
Open up the sandwich so that the goose lies evenly on the front of the two background squares and press. 
Hey presto – one flying goose (measuring 2½” x 1½”). 

You can batch make a whole gaggle of flying geese using this method and when you come to stitch them together you will be able to see clearly where the tip of the goose is as it is lying between the seams (you will see what I mean when you come to do it).

So there you have it.  You can make the geese any size you like – fat, thin, long, short.  Play around and have fun.  But here are some measurements to get you started:
 
Finished
Goose            Cutting Sizes

2” x 1”             Cut one 2½” x 1½” goose block and two 1½” background squares

4” x 2”             Cut one 4½” x 2½” goose block and two 2½” background squares

5” x 2½”          Cut one 5½” x 3” goose block and two 3” background squares 

6” x 3”             Cut one 6½” x 3½” goose block and two 3½” background squares
 
Wish me luck in the competition.......                                         

Monday 3 June 2013

Pickled Patchsmith welcomes Zakka 2.0

Pickled Patchsmith pieced a pair of patchwork peppers. 


Did pickled Patchsmith piece a pair of patchwork peppers? 


If pickled Patchsmith pieced a pair of patchwork peppers,
 
 
Where’s the pair of patchwork peppers pickled Patchsmith pieced?

 
......... and more to the point do they contain gingham?
 
If you must know the pair of patchwork peppers this Patchsmith pieced are being used as we speak.  And technically – no, they do not contain gingham (shock, horror!).  They do contain checked fabrics though but no gingham - not in the first week.
A shaped coaster is always fun to use and these were fun to make. I made a cardboard template of the pieces so that I could draw around them easily.  This really speeded things along.  I chose to make a pair in my favourite colours – red and green, but as peppers also come in yellow and orange there is enough colour choice for a quartet.  What a great start to the Zakka 2.0 sew-along.

p.s.  I wasn't really 'pickled' (slang for 'merry on wine') - it was just for the purposes of the tongue twister that I used this word.  I was going to use 'perfect' or 'pretty' but daughter pointed out that we have trade-description laws in this country!

p.p.s. Check out this week's host, Sew Take a Hike's blog for a nifty way to turn these coasters into pot pads!    

Saturday 1 June 2013

Across the Pond to the Tooth Fairy's House

I can’t help it – it is just the way I am ..... I like things to have a function.  It is true that sometimes I make something that has no practical purpose but just looks so darn good - like this month’s Across the Pond sew-along project – the house ornament from Retro Mama.
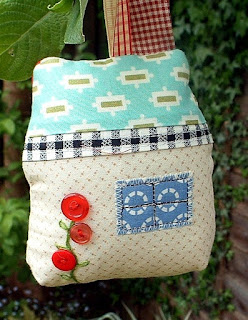
This turquoise house hangs on my wardrobe door (when it isn’t hiding amongst the trees) and it is a joy to look at.  It is simple yet elegant and contains three of my favourite fabrics – black/white check, red gingham and Bonnie & Camille's Vintage Modern on the roof. 
The free pattern and excellent tutorial can be found on Retro Mama’s website.  There you will see houses adorned with rick-rack and pom-pom trim, with birds and door numbers. 
Retro Mama's Neighbourhood of House Ornaments
However, when I made my turquoise house I didn’t even have ribbon to hand so, in the make-do-and-mend spirit of a quilter, I used a strip of black-and-white check fabric in its place.  I added a window and some button flowers to the back and left the bird off the front.  
I love the simplicity of my version though Retro Mama’s houses are truly awesome.  But whilst I love my turquoise house and have chosen it as this month’s project, I couldn’t help but tweak it slightly to create a purpose for this wonderful little ornament.  So may I present ....... {drum roll} ......... the Tooth Fairy’s House. 
I know what you are thinking - it looks identical to the turquoise house but with different fabrics.  Ahh, to see the real difference we need to nip round the back.
Still can't see the difference?   Perhaps this will help .....
I have adapted Retro-Mama’s pattern slightly to add a pocket to the back so that children can put their tooth in the pocket and hang it on their bedroom door or bedpost.  The tooth fairy no longer has to creep about, searching under pillows and sleepy heads, for that pesky little molar.  Instead she can extract the tooth (excuse the pun) and pop a coin in the pocket ready for when the child wakes up.  Cool eh? 

And as every household should have at least one Tooth Fairy House I guess I better tell you how easy it is to add this extension to the Retro Mama house ....... 

Add any embroidery if desired, before pinning to back of house
Firstly cut out the house pieces as per Retro Mama’s tutorial (step 1) and cut an extra rectangle of ‘house’ fabric that is as wide as the house template and 5½” deep.  Fold it in half, wrong sides together and press. 

When you cut the corners out of the bottom of the house pieces (step 2), repeat the process on the bottom (raw edges) of the folded rectangle.  This rectangle forms the pocket and should be pinned to the right side of the bottom of the house back so that the raw edges match the bottom of the house.  (The house back is the non-interfaced house piece.)
Pocket lies on top of house back
(If you want to embroider the back pocket, as I have done, you will need to do so before you pin the pocket to the house.) The pocket is stitched in place when you stitch the house pieces together.  Simple. 

Whether you add a pocket or not this is a quick and easy project that will take little more than an hour.  So why not jump on-board for this month’s Across the Pond sew-along.  There is a Flickr group and discussion thread for any questions or tips – I will check in regularly throughout the month.  And we’re a nosey lot on-board this SAL so please post a photo of your finished project in the Flickr group so we can check out your neighbourhood.
Sew until next time ......